背景
10月份在公司内部的开源协同项目上认领了一个 issue,任务是为内部测试框架实现一个测试报告可视化工具,当时对接人提供了 Allure 作为选型参考,最后经过一番摸索也终于实现了既定效果。因为 Allure 展现效果确实还不错,但是官方没有底层 schema 的详细说明,所以实现过程也有一些摸索,这里记录下,或许会有人遇到类似的问题。
什么是 Allure 框架?
Allure,全称 Allure Report,是一个跨编程语言的测试报告工具,通过定义统一的底层 Schema,官方提供了多个编程语言版本的适配实现,目前主要有 Java、JavaScript、Python、Ruby、PHP、Kotlin、.Net 以及 Go。
Allure 可以生成比较简洁的测试报告,报告划分“Overview”、“Categories”、“Suites”、“Graphs”、“Timeline”、“Behaviors”以及“Packages”几大板块,可以访问Allure demo 查看示例效果。如果需要了解更多不同的测试集展示的效果,可以访问 RESTest showcase 浏览。
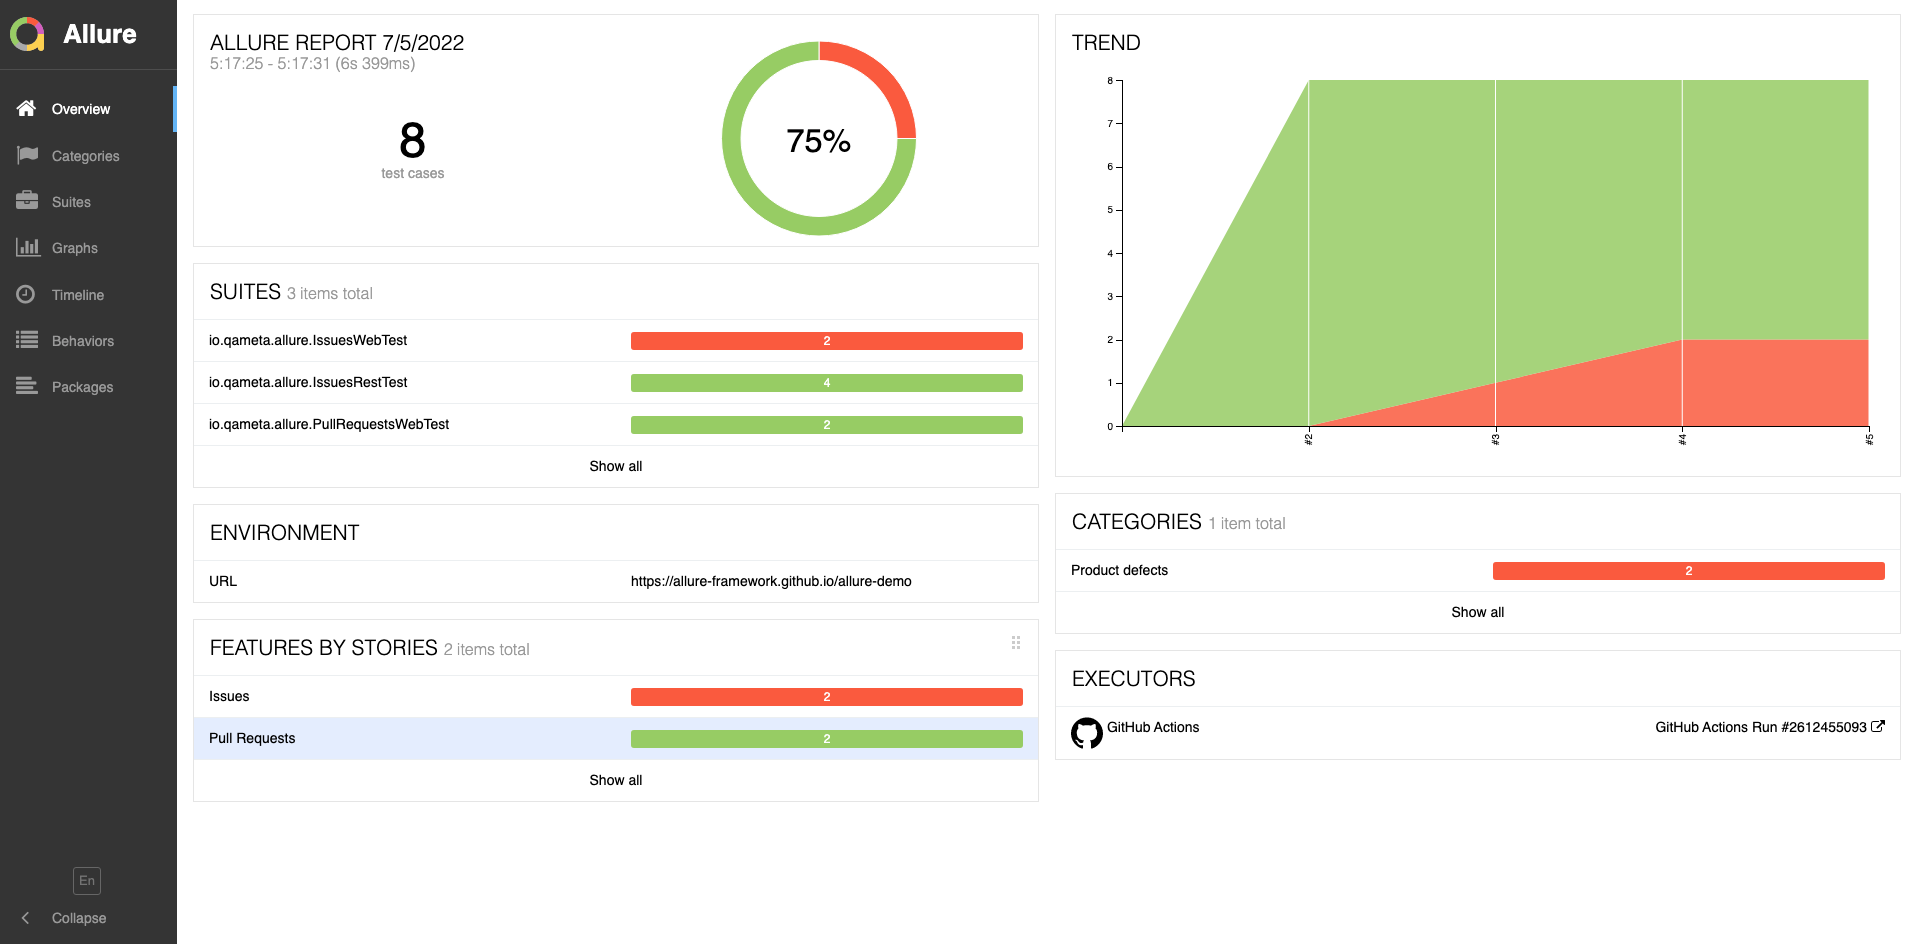
除此之外,Allure 也支持多语言切换,目前官方示例包含英语、中文、德语等在内的 12 种语言。
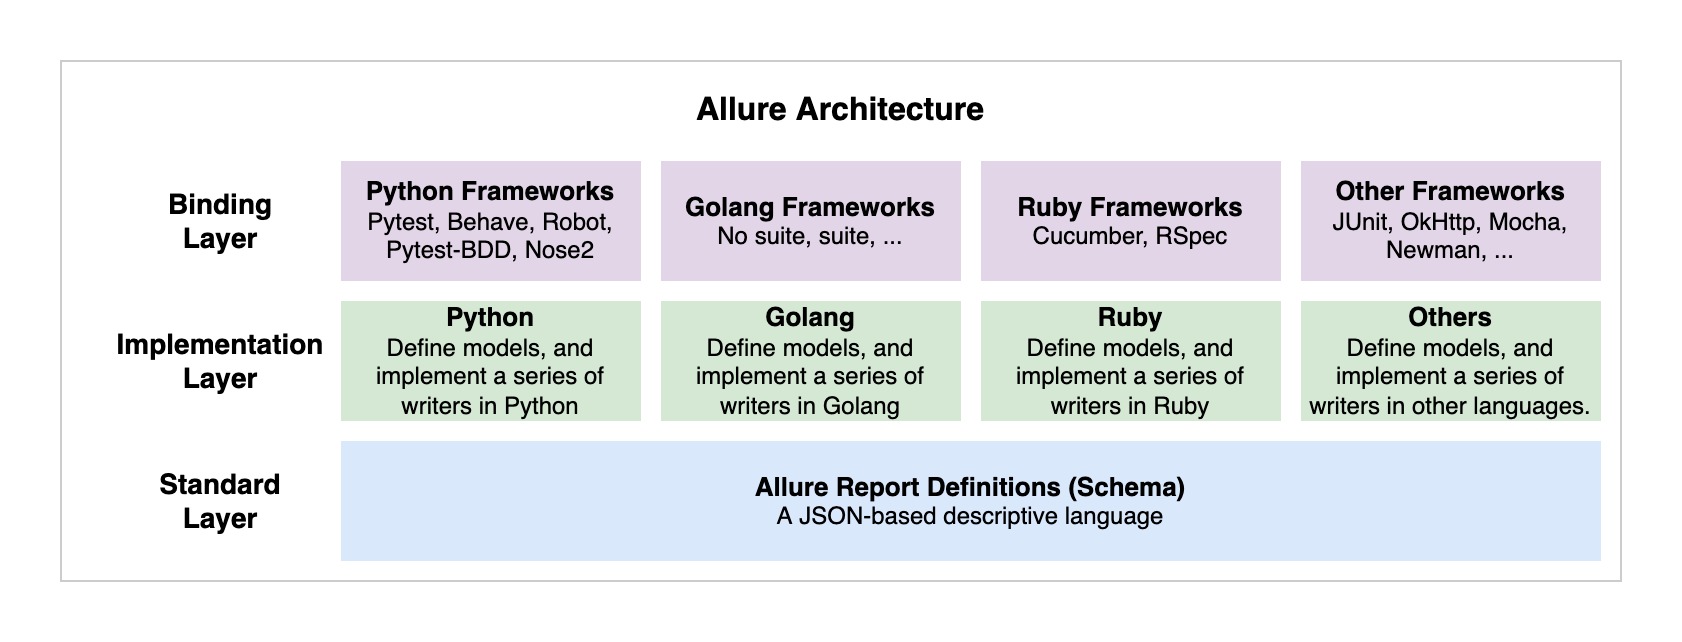
Allure 框架在各个编程语言之上构建实现了整个测试报告的生态:
Allure Schema
Allure 的跨编程语言特性得益于一套基于 JSON 格式的 Schema,官方在其各个编程语言版本的源码都有相关的定义,比如 Python 版的可以查看 allure-python-commons/src/model2.py。
但是官方对具体的 Schema 没有文字性的文档,所以 Schema 定义和最终生成报告中的效果的关联,没有确切的说明。我经过摸索和尝试,整理了 Schema 中各个模型的关系:

示例
为了直观对比 Schema 和最后生成的报告效果,可以查看这段 allure 的测试用例报告代码:
{
    "name": "test_shell_testcase_failed32",  // 测试用例名
    "status": "failed", // 测试用例结果,在上图中对应 `Status` 枚举值定义
    "steps": [ // 测试步骤,在测试报告中展示在面板右下角的 Test body 里
        {
            "name": "#@ 测试步骤:17:",
            "status": "passed"
        },
        {
            "name": "#@ 测试步骤:28:",
            "status": "passed"
        },
        {
            "name": "#@ 测试步骤:39:",
            "status": "passed"
        }
    ],
    "start": "1665562034999",  // 测试用例开始时间
    "stop": "1665562053613",   // 测试用例结束时间,和开始时间一起确定本用例的耗时,这里是 18s 614ms
    "uuid": "test_python_testcase-result-37", // uuid,这个可以由库代码自动生成
    "testCaseId": "20220411-152848-724647399", // 同样可以由库代码自动生成
    "labels": [
        {
            "name": "suite",  // 这是一个特殊的 label,当为 suite 时,value 表明当前用例对应的测试集名称
            "value": "tst_suite_common2"
        },
        {
            "name": "tag",  // tag 是普通的标签,显示在报告中的用例详情中
            "value": "feature"
        },
        {
            "name": "tag",
            "value": "medium priority"
        },
        {
            "name": "tag",
            "value": "level:3"
        },
        {
            "name": "tag",
            "value": "type:feature"
        }
    ]
}
以上 schema 对应的测试报告如图: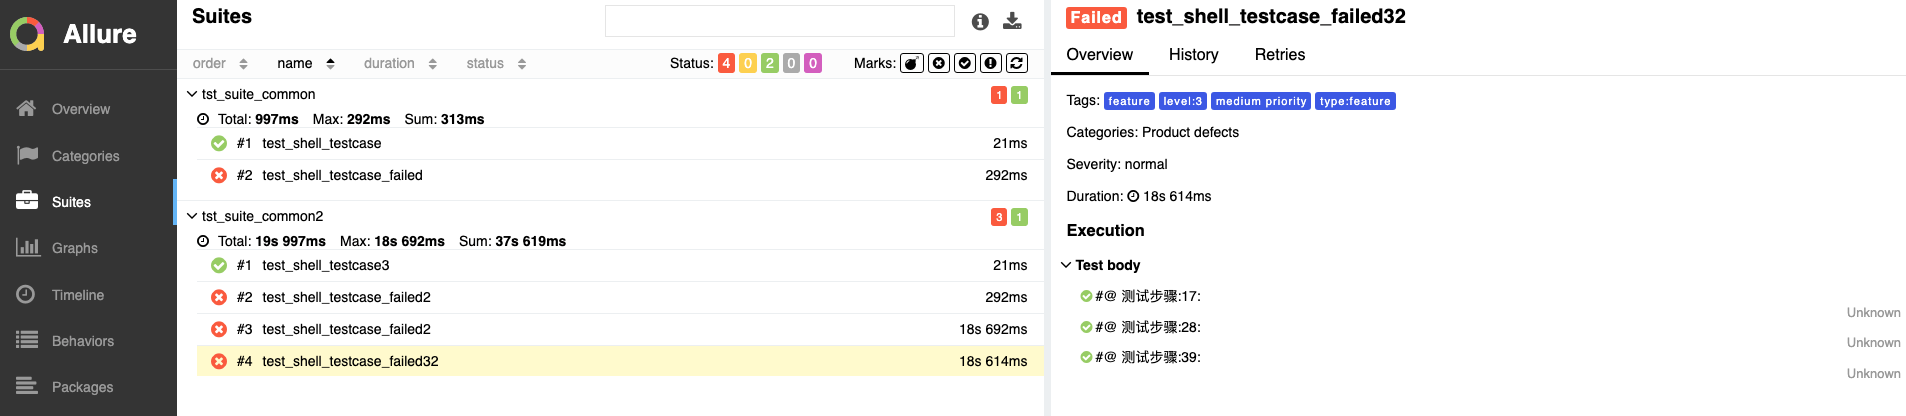
如何基于官方库实现标准的 schema 生成?
以 python 为例,可以使用官方代码库 allure-python-commons 中的 AllureFileLogger。
一个极简的例子是:
from allure_commons.logger import AllureFileLogger
from allure_commons.model2 import TestResult, Status, Label, Link
from allure_commons.types import LinkType
from allure_commons.utils import now, uuid4

if __name__ == "__main__":
    logger = AllureFileLogger(report_dir="tmp/logger_reports/")
    result = TestResult(
        name="test case",
        status=Status.PASSED,
        # statusDetails="test passed",
        stage="local test",
        description="simulation test",
        descriptionHtml="<h1>simulation test</h1>",
        start=now()-3000,
        stop=now(),
        uuid=uuid4(),
        historyId=uuid4(),
        testCaseId=uuid4(),
        fullName="a fake test case demo",
        labels=[Label(name="owner", value="martinhong"), Label(name="weight", value="highest")],
        links=[Link(type=LinkType.ISSUE,url="https://google.com.hk",name="fake link")])
    logger.report_result(result)
运行以上的代码,生成的 allure schema 代码如下:
{
    "name": "test case",
    "status": "passed",
    "stage": "local test",
    "description": "simulation test",
    "descriptionHtml": "<h1>simulation test</h1>",
    "start": 1664635107494,
    "stop": 1664635110494,
    "uuid": "083c72da-668c-406c-a258-ba61f2eec2f2",
    "historyId": "c665bc04-9b63-426f-a7ce-b1981853d775",
    "testCaseId": "2b53d7b0-2127-46ab-8c72-ec2e5c97b759",
    "fullName": "a fake test case demo",
    "labels": [
        {
            "name": "owner",
            "value": "martinhong"
        },
        {
            "name": "weight",
            "value": "highest"
        }
    ],
    "links": [
        {
            "type": "issue",
            "url": "https://google.com.hk",
            "name": "fake link"
        }
    ]
}
对应的可视化报告为: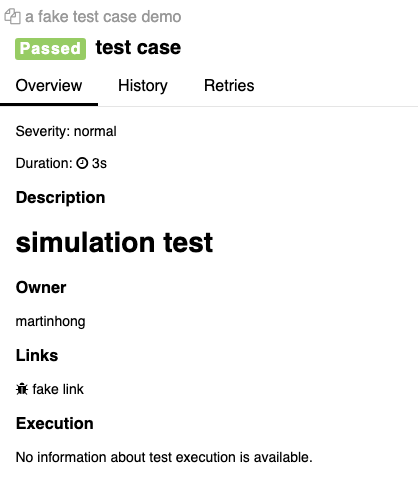
参考资料
版权声明:本文为原创文章,转载请注明来源:《Allure 测试报告可视化工具入门 - Hackerpie》,谢绝未经允许的转载。